NTP Management
This screen is used to configure the settings related to NTP (Network Time Protocol) management in SambaBox. The function of each field in the screen is explained below:
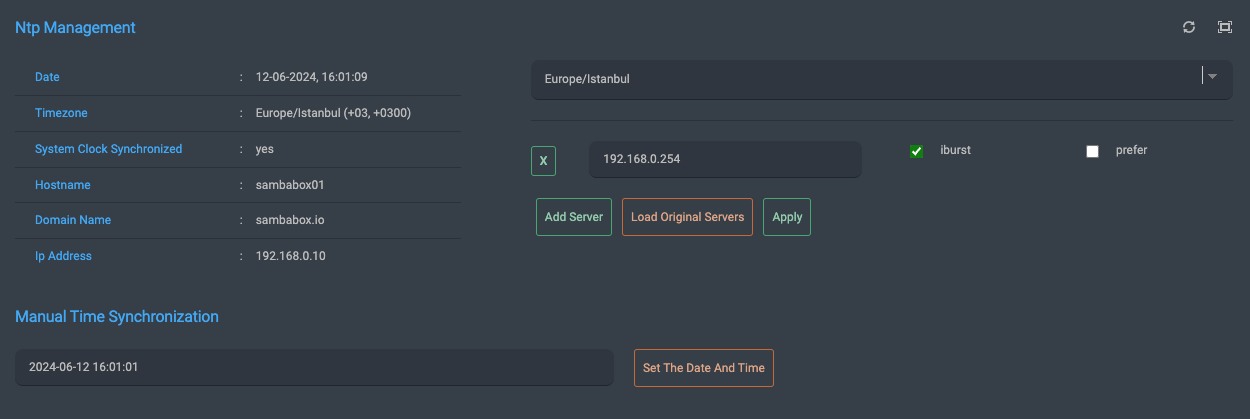
Date: Displays the system date. In the example, it is shown as “12-06-2024, 16:01:19”.
Time Zone: Displays the system time zone. In the example, it is set to “Europe/Istanbul (+03:00)”.
System Clock Synchronized: Indicates whether the system clock is synchronized with the NTP server. In the example, it is “yes”.
Hostname: Displays the name of the SambaBox system. In the example, it is “sambabox01”.
Domain Name: Displays the domain name of the SambaBox. In the example, it is “sambabox.io”.
IP Address: Displays the IP address of the SambaBox system. In the example, it is “192.168.0.10”.
NTP Server: - Displays the IP address of the NTP server being used. In the example, it is “192.168.0.254”. - iburst: When this option is checked, the NTP client sends several rapid requests to achieve faster synchronization. - prefer: When this option is checked, the specified NTP server is set as the preferred server.
Add Server: Used to add a new NTP server.
Load Default Servers: Used to restore the default NTP servers.
Apply: Used to apply the changes made.
Manual Time Synchronization: - Used to set the system time manually. In the example, the manual time is entered as “2024-06-12 16:01:12”. - Set Time and Date: Used to apply the entered manual time.
Time Zone Setting
The local time zone selection is made from the Time Zone dropdown box. It sets the server’s time as UTC +/- the time zone value.
Hint
Time Zone Selection
When selecting the system time zone, make sure to choose the correct time zone according to the user’s geographical location.
Time Server Management
The time servers defined on SambaBox can be added or removed from this section.
Adding a Time Server
To add a new time server, click the [Add Server] button, enter the network address (IP) or name (must be resolvable via DNS) in the box that appears, select the iburst and/or prefer checkboxes, and then click the [APPLY] button to activate it.
Hint
iburst
When the time server is unreachable (tries to find out if a host is reachable), it sends a burst of eight packets and then shortens the time until the initial synchronization. It is used for faster time synchronization. Normally, the gap between NTP packets is about 16 seconds to allow the call to complete. Once the server is reached, the gap between packets drops to about 2 seconds.
Hint
prefer
Marks the time server as the preferred server. When all other factors are equal, this host will be chosen for synchronization among a set of correctly operating hosts. This option can be used with any peer or server but is most commonly used with a radio clock.
Changing a Time Server
To change the information of time servers, make the necessary changes in the respective fields and click the [APPLY] button to activate them.
Deleting a Time Server
To remove a time server from the list, click the [X] button in front of the server to remove it from the interface. The old settings will remain active in the system until the [APPLY] button is clicked.
Hint
Load Original Servers
Allows the old settings to be restored if the [APPLY] button is not pressed after making changes to the time servers.
Manual Time Synchronization
To set the server’s time to a desired date, select the date and time, and then click the [Set The Date and Time] button to set the server’s time.